


I have always been partial to a good gallery wall, but I haven’t had really anywhere to create one for many many years. And while I always knew I’d be creating several gallery wall setups at SVF, I decided to create one in our rental as well. Because no matter what anyone tells you, a gallery wall is ABSOLUTELY possible in a rental! When you move, a little spackle and some touch-up paint are all you need to put things back just as you found them!
So in the spirit of making your house feel like home with some beautiful art, I’m sharing my step-by-step to creating the perfect gallery wall for your space! (UPDATE: Adding in photos of our main gallery wall at SVF now that we’ve moved in! I followed these same principles when creating this gallery wall as well!)
**This post contains affiliate links, which give me a small commission on items purchased through my links, at no additional cost to you. I appreciate you shopping through my links more than you know, and it truly helps me continue making great content for you to enjoy! For more information, see my Privacy & Disclosure Policy!**
SHOP THIS POST

Create the Perfect Gallery Wall – What You’ll Need:
- Frames – all my favorites are here; but my first stop is ALWAYS Goodwill to look for frames – you can find some affordable and beautiful one-of-a-kind options!
- Art – My favorite art comes from Lindsay Letters, one of my favorite female-owned businesses! For a limited time, you can use code SUNRISE to get 15% off sitewide!
- Picture hanging kit
- A quirky item or two
- And just in case you’re looking for my floor mirror that I used as the focal point in the gallery wall at SVF, here it is!
Create the Perfect Gallery Wall – How To:
Step 1: Measure your space so you know what size “canvas” you have to work with. If you’re nervous about selecting the right sizes for art, I suggest grabbing some butcher paper and cutting it in different sizes. You can then tape these up on your wall to get an idea for sizes and placement of your art.
Step 2: Source your art. I’ve created several gallery walls, and as my style has grown, I really enjoy mixing all different styles of art – abstract, landscapes, still life, florals, and more. That said, I’ve also created gallery walls that are all one “type” of art. In the photo below, you can see I pulled together all landscape photos, and it turned out beautifully! Sticking to one type of art is also great if this is your first gallery wall or you’re nervous about making art selections.
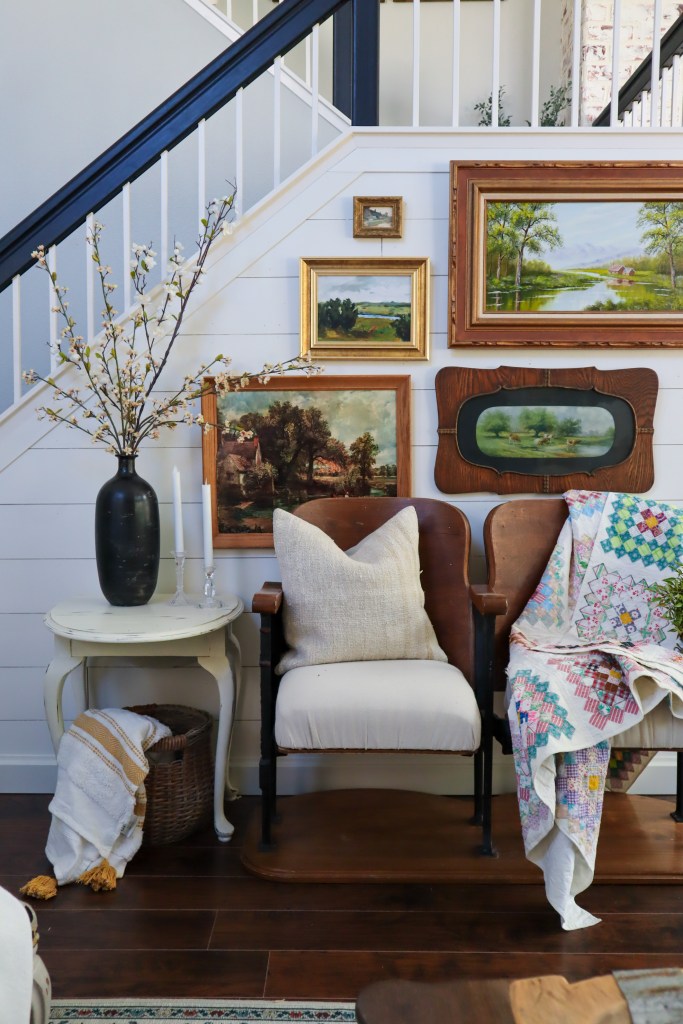

If you go the route of mixing different types of art, I also recommend mixing colors with black/white prints.
Step 3: You can also see that mixing different sizes and shapes of frames is key to creating the perfect gallery wall. In the photo above, I worked with the frames I had (or what the art came in), but if I were to do it again, I’d add in a good oval frame to tone down all the sharp corners and straight lines (especially with the shiplap behind).
I also mix frame materials. While there is a time and place for gallery walls that are all the same fame material/size, I prefer the more eclectic gallery walls. And if you go eclectic, mixing is key! Grab some black frames, gold frames, silver frames, and wood frames, and mix them all together!
Step 4: Mix different matting. I like to have a mix of frames with mats and without. I also LOVE finding frames that are rectangular but have an oval opening – it’s like a faux mat and ads to much interest! You can grab my favorite mats on Amazon, here!
Step 4: Mix vintage and new. Finding gorgeous vintage art is such a rush! But it’s not always easy (or cheap)! Inevitably, you’ll want to source some new art in addition to any vintage pieces you might have. I love Lindsay Letters because now only can you find beautiful new pieces, but she also has a vintage prints collection, which are reproductions of vintage and antique art.


Mixing new with vintage creates a truly found look to your gallery wall, which grounds it in your space. You can also mix both vintage and new frames. I source so many frames from goodwill, but I also often include a few new frames from Amazon. Lindsay Letters also frames pieces as well!
Step 5: Add non-art to your wall. This isn’t always a must, but I find it really adds character and charm to a gallery wall, especially if your wall is quite large. Here, I added some beautiful sconces and a really cool hanging metal planter that I added some eucalyptus into.
Step 6: Lay your art out on the floor before you put it up on the wall. It’s a lot easier to move pieces around on the floor before you nail them up on the wall! While you lay out your pieces, be sure you are staying inside of the boundaries of your wall.

Also, work to separate frame styles and shapes. For example, you don’t want all of your oval frames on one side of the wall and your rectangular frames on the other. Try to mix them up instead. The same goes for framer material (don’t put all your black frames next to each other); and even art style (mix your abstract pieces up within the gallery wall, rather than placing them all next to each other). Doing this keeps your eye moving and interested as you absorb each part of the wall.
SHOP THIS POST


Step 7: Finally, hang each piece. I like to work from one side to the other, or from the largest art piece, outwards. If something gets hung in the wrong spot, don’t be afraid to move it and touch up the nail hole. I promise it’s easy, and you’ve got this!


And there you have it! My top tips for creating the perfect gallery wall! And as long as you are using art that you love, you really can’t go wrong here! Trust yourself and go for it!
As always, everything I used in this post is linked for you! I hope you’ll consider supporting Lindsay’s business at Lindsay Letters with code SUNRISE for 15% off for a limited time! Snagging some of her unframed art prints is the perfect way to collect beautiful art for a gallery wall in your home. And then hit up Goodwill to snag some beautiful frames!
Until next time…


Ana…I missed the pop up to subscribe and so was going to subscribe on the top of this page..I added my name and email but there’s no submit button! I have been with you for ages but I wasn’t sure if I had to resubscribe here.
Shirley🙃🤪
This guide is fantastic! I love the idea of sourcing frames from Goodwill—such a great way to find unique pieces while keeping it budget-friendly. Also using butcher paper for layout planning is genius—definitely trying that on my next gallery wall! Thanks for the inspiration!